12 Tips For Making Flatter Panel Glue Ups – Build Amazing Tables
Gluing up a panel for a woodworking project is an important skill to develop as a new woodworker. I’ve made panels for many projects, including a dining table, coffee tables, end tables, a computer desk, and others.
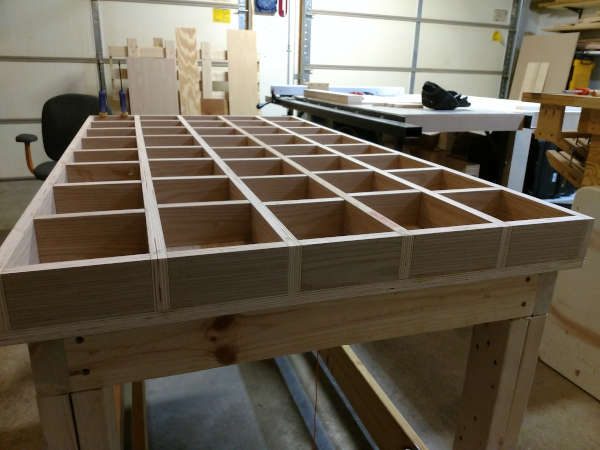
I’ve messed a few up, but I’ve also learned some tricks along the way. Now when I glue up a panel, I can test my results like this:
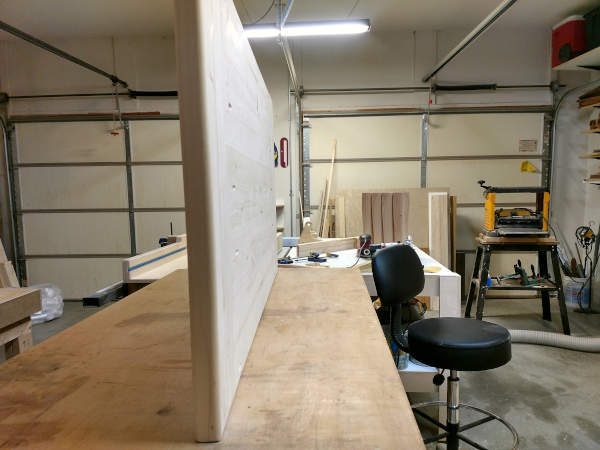
This is a coffee table top balancing on its edge. It also balanced and stood up straight on its short edge. And this was AFTER I put the round-over edge on the corners.
I do this to comfirm my panel came out nice and flat after construction. Had there been any cupping or twist, it would not stand up on end.
But there’s more to this process than eliminating warpage. You also want a smooth, flat surface by having your boards line up just right during the glue-up.
Below I’ve detailed my 12 biggest tips for building flat and level panels. Enjoy!
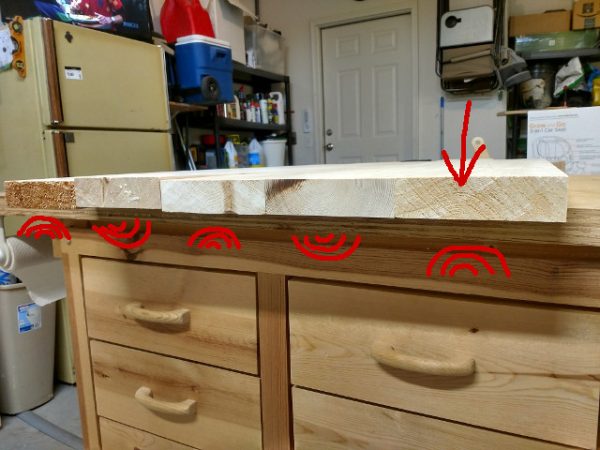
1 – Use Flatter Boards
This one seems obvious, but don’t overlook it. If you don’t use flat boards, you can’t create a flat panel. When shopping for your boards for the project, find the flattest ones you can get.
Sometimes that means getting boards that have at least a section of flatness. I’ve had to identify flat 2 or 3 foot sections of an 8 foot board plenty of times for making panels.
Once the boards are roughly cut down to size, lay them out and make sure they’re not warped. Push down on each corner of the board to identify any rocking that occurs. This could mean there’s bow or twist.
Either do away with any boards that are warped, or spend some time flattening that piece.
>> Read up on flattening lumber here
2 – Double Check Your Table Saw Blade For 90 Degrees.
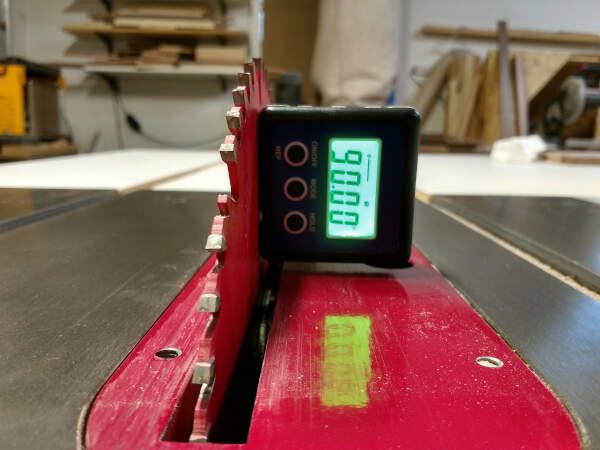
When ripping your boards for a panel glue up down to their final width, you want a perfect 90 degree cut on each edge.
The best way I’ve found to accomplish this is using a magnetic digital level when aligning my blade. This is more precise than holding a square against the blade.
The magnetic level can be used to compare two surfaces, by using its ‘reference’ feature. Set your reference to the table saw’s table, and then put the level directly on the blade. Make adjustments until it’s perfectly 90.00 degrees.
>> Learn more on using the digital level here
3 – Alternate Your Boards When Using An Edge Jointer

If you have an edge jointer, then you have the ability to produce perfectly flat panels with ease… Assuming you use the jointer correctly.
More often than not, a jointer will be just slightly out of square. If this is the case, you may not notice on a single edge.
But when gluing multiple boards together, the slight error will compound on itself and create a warped panel.
So here’s what you do:
- Lay out your boards how you want them in the end.
- Now number each board in order, starting at 1. The numbers should all be on the same side of each board (either the top face or the bottom, not both)
- Now make note on a piece of masking tape right next to your jointer that says this: “Odds Go Against The Fence”
- Now take board number one, and run both edges through the jointer. The number “1” that you wrote on the board should physically be against the fence for each run. That means after you do the first edge of board 1, you rotate it in a way that the number remains against the fence, and do the other edge.
- Now for board number “2”, you make the number face away from the fence for each edge-jointing.
- Repeat this process so the every Odd number runs against the fence, and every even number is away from it. That’s what your note above will remind you of, to make sure you don’t get it backwards.
What this does is it allows any error from 90 degrees to offset itself by making each mating surface error in the opposite direction.
So even if you have an edge that is 89.7 degrees, the angle of its mating piece will be 90.3 degrees. So when pushed together, you get a nice, level match.
Note: If you don’t have a jointer, you can still produce very square boards for your panels. See How To Square Up Boards With A Table Saw.
4 – Use Cauls When Clamping
It can help to use wooden cauls across the top and bottom of your panel during glue up. This takes more set up and planning, but it may be worth it if you struggle producing good flat panels.
A clamping caul can be made from hardwood, ideally to be cut about 3 inches wide, from 1” thick stock.
The cauls should be on top and bottom, sandwiching the panel together up and down, holding the boards in line with each other.
At the same time, you must also clamp edge to edge to pull the boards in together, so be sure you account for that when prepping the glue-up staging area.
If your panel is 2 to 3 feet wide, you should get good results with cauls. But beyond that, they start to get less effective. On these wider panels, there will be enough flex in the cauls that they can no longer hold the panel down flat if the boards want to shift.
That’s where biscuits, dowels, or different types of clamps can be helpful, continue reading to learn more.
5 – Use The Best Clamps For Panel Glue Ups
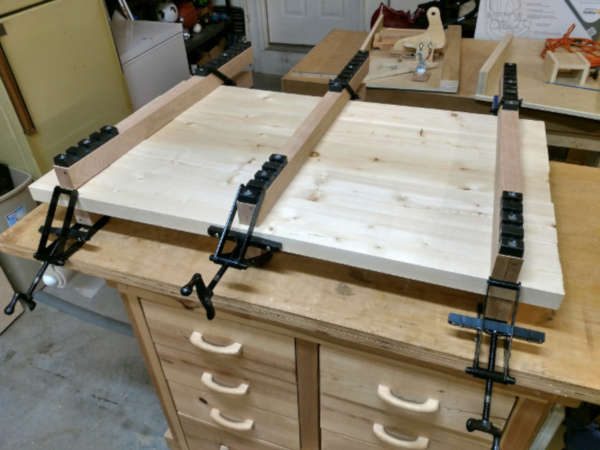
If you want to combine the main clamping and the caulling together, you can use what’s called panel clamps.
These are bought as a hardware kit, to which you have to add your own hardwood boards. This way they can be made to whatever length you want. And even after they’re assembled, there is some adjustment for the clamp placement, which allows for various width panels.
These clamps apply inward pressure at each edge of the panel. This pressure will also produce the sandwiching pressure like the cauls do. The tighter you pull in the edge clamping, the tighter the sandwiching action.
These do work pretty well, but you may still find that a little adjusting with a rubber mallet or dead blow hammer is in order, to make each joint perfectly flat.
In my opinion, these panel clamps are worth it when I’m doing a table top panel that is 36” wide or less, and requires 3 or more glue joints in a single glue up.
>> You can find the panel clamp here on Amazon
6 – Glue Up The Panel In Stages
In some cases, you may not be comfortable worrying about multiple glue joints in a single glue up. This can add stress, and increase the chance that your glue up doesn’t turn out as expected.
So on large panels, its can really help to only glue up 2 or 3 joints at a time. This may extend the overall process to several days, but if it saves you stress and creates better results for you, than it’s worth it.
Just be sure to use clamp pads as to not mar up the edges of any of the boards during your intermediate glue ups. This will result in an ugly joint that may be irreparable, and would have to be filled later.
7 – Add Biscuits Or Dowels
A more tedious method for helping to align your boards in a panel glue up is with the addition of biscuits or dowels along the edges.
This definitely increases the amount of working time needed for the glue, but it really can help hold the boards inline while you can put your focus on applying the clamps.
To use this method, you’ll need either a biscuit cutter or a doweling jig and a drill. Biscuits are bought, not made. They come in different sizes, and for panels you’ll want to use the largest size of biscuits you can get.
Similarly, dowels are also bought premade and you can use ⅜” dowels, 2” long, for most panel thicknesses.
It may be a good idea to plan on doing your panel in stages if you are using biscuits or dowels. This is because you will be spending more time applying glue, which takes away from the work time you have to get everything clamped.
You have to apply glue not only to each edge, but also inside each biscuit or dowel hole, and on each biscuit or dowel. This really adds up.
8 – Work On a Flat Surface
If your clamps are setting on a warped surface, than how can you ever create a flat panel?
Make sure your work area is nice and flat. That may mean building a simple assembly table or a real work bench.
If the surface of your work area is raw wood, you can use cardboard or construction paper (the kind that comes in a roll) to cover and protect the surface from the glue squeeze out.
>> Read here on how to build a perfectly flat and rigid assembly table
9 – Do a Dry Clamp-Up
One of the easiest things you can do to have a smoother glue up process is to simply practice.
Do a dry run of the glue up, without using any glue. This way, you’ll have your technique figured out ahead of time, and you’ll head off potential problems.
By doing this dry run you can make sure you haven’t forgotten any critical parts of the process.
While clamping though, do not fully tighten your clamps, as this could potentially close up wood fibers making them absorb less wood glue during the real deal.
And finally, if you identify any gaps during this stage, then you should do more work to the boards. Do not assume you will pull the gap closed with more clamping pressure. That’s a great way to potentially ruin the panel.
TIP – usually to close a small gap, the 2 boards need a couple runs over the jointer, or a quick clean-up cut on the table saw.
10 – Use The Right Kind of Glue
When you’re rushing around trying to apply glue, line up clamps, apply pressure, align the boards, and check for perfection the whole time, a typical glue-up process can be quite stressful.
I mean, you’re only risking ruining a project if you don’t do everything just right, and fast! So to help clear your mind and focus, it’s best to use a wood glue with longer working time.
I recommend Titebond 3 for the job. This glue is a PVA glue and it has a 20 minute working time.
But that doesn’t mean after clamping. That’s before clamping. So once you start applying pressure, you still have to have everything ready and move quick.
But, while applying the glue, using something like Titebond 3 will at least keep the glue from getting hard before you even get a chance to push the boards together!
>> Read more about wood glues here
11 – Alternate Grain Direction
Look at the end grain of the board and notice how the grain cups in one direction. There’s a possibility that the board will try to flatten its grain.
What that means is it will develop a “cup” over time. This cupping action will be opposite of the grain curve, because basically the grain is attempting to flatten out, which will warp the board to develop the “cup”.
What that means for you is that in order to make a panel that remains stable, you should alternate the direction of the end grains for each board in the panel.
Just one board alone, assuming it’s a dried board, will not warp so bad after you build the panel to ruin the top.
But if you had multiple boards glued up, all their grain facing the same way, well then their warping actions are all added together, and it could potentially be noticeable if/when it happens.
12 – Use Good Clamping Techniques
Start with using just enough glue to get some squeeze out. This is a judgment call, and you’ll get better with experience. If you end up with a nice even line of squeeze out, you did great. If sections with no squeeze out, then you used too little. If you have glue dripping everywhere, you used too much.
Line up 3 clamps to start with, they’ll be underneath your panel. Apply the glue and lay the boards in place on the clamps.
Tighten the middle clamp until you see squeeze out. Now tighten each clamp on the ends, and use quick clamps to help line up boards at the end. Use a rubber mallet and a block of wood along the middle to help convince the boards to lay flat.
Now inspect each joint to identify high spots. Wipe away squeeze out with a damp rag to help see.
Once you’re happy with the lay of the boards, tighten the clamps up just a bit more, making sure nothing adjusts one last time.
Now put your remaining clamps on from the top of the panel. This is important, as having all your clamps on the same side of a board tends to make the panel bow. By having clamps on both sides, this is less likely to occur.
Related:
Wood Glues Explained
Torsion Box Assembly Table
Reasons To Get A Digital Level
Buy The Panel Clamps Here
How To Flatten Your Lumber