Types of Wood Screws and Pre Drilling Explained – Diagrams Included
You’ve probably heard or read about various types of wood screw heads and drivers. But don’t let all these terms confuse you. If you can remember the following 6 common screw types, and 5 driver types, that should cover most of what you’ll ever need in woodworking.
And it can also help to understand the difference in clearance holes, pilot holes, countersinking and counterboring, plus when and where each apply. I’ll explain further down the page.
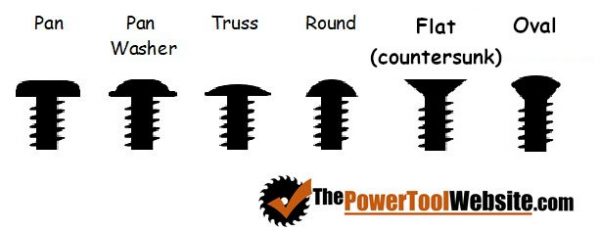
Common Wood Screw Head Types
These are common types of screws used in many woodworking projects, and in construction and finish work.
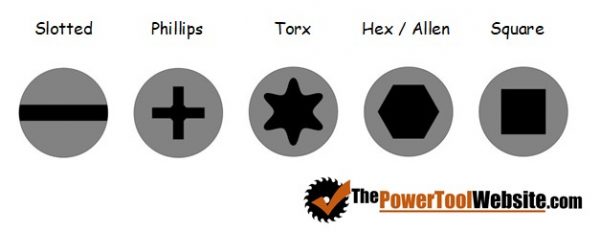
Common Screw Drive Types
These drive types each use a different driver bit, which can be driven by hand, or a drill.
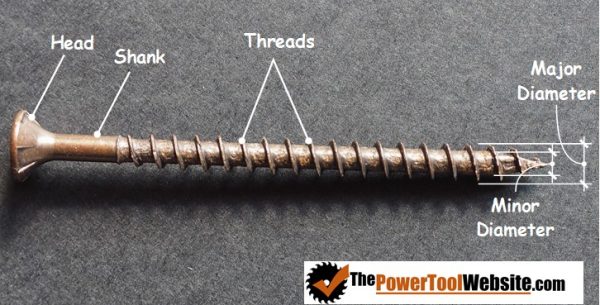
Basic Anatomy Of A Screw
Here’s a simple diagram illustrating the parts and terminology of a wood screw.
How Wood Screws Are Supposed To Work
You may think that this is a common-sense topic, but I’ve seen more than a few people do this wrong simply because they didn’t understand how it’s supposed to work.
Put simply, a screw should hold 2 pieces of wood together by pressing one board into another. As the screw gets progressively tightened, the pressure between the boards should increase.
The threads should pull the receiving board, and the screw head should drive the lead board.
This does not include threading the screw into the wood fibers of the leading board. If you simply thread the screw through both boards, you’re not compressing the boards together at all, and instead you’re simply holding them in place at the force as you were pushing them together when you started screwing.
In fact, it’s possible for the boards to be held slightly pushed apart in that scenario. It’s called bridging, and it can ruin a joint.
To do things correctly, you should understand and utilize clearance holes and pilot holes…
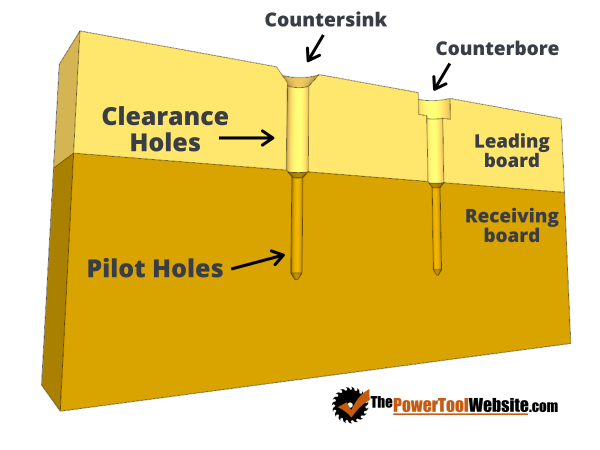
Pilot Hole
Think of a pilot hole as piloting the tip of the screw. It leads the screw in the desired direction.
Plus it reduces the chance of the screw splitting the board by clearing material away for the Minor Diameter of the screw.
The threads will cut into the wood fibers and grab hold. Softer woods do better with coarse thread, while fine thread screws can be very effective in hard woods.
There’s no perfectly sized pilot hole for every screw size. It can (and will) vary, mostly based on wood hardness, and on what bits you have available. Perfection is simply not required.
But if you’re a technical kind of person, refer to this clearance and pilot hole chart.
However, pilot holes are not always necessary. You can often get away with not drilling any pilot hole, especially if screwing into softwood, or using small diameter screws (like #6).
You also won’t typically use pilot holes with pocket hole joinery. Instead, you’ll pre drill a counterbored clearance hole (explained below) in the leading board, and nothing in the receiving board. The screws are slotted to help tap the hole as they’re drilled, plus remove material to reduce the chance of splitting the wood.
On the other hand, there are times you should always use pilot holes. Using standard screws in hardwood is one such case. Without a pilot hole in hardwood, you can end up twisting the head right off the screw.
Also, when you’re attaching hardware, it’s best to use pilot holes as this ensures the screws stay aligned as needed.
Clearance Hole
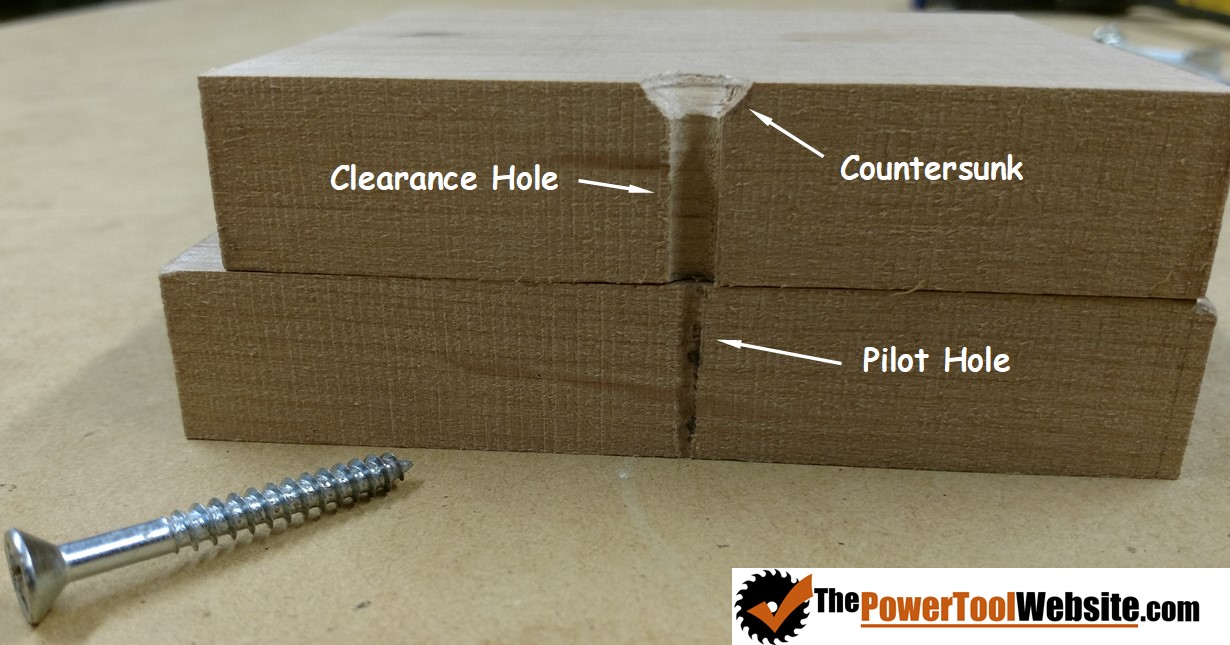
A clearance hole gives complete clearance for the shank and the threads, but catches and holds the head of the screw.
A clearance hole is as large or larger than the Major Diameter of the screw (see diagram above).
You can get a special bit that creates your clearance hole and countersinks all at once. These bits are adjustable, and can really save time when drilling a lot of clearance holes.
Countersinking
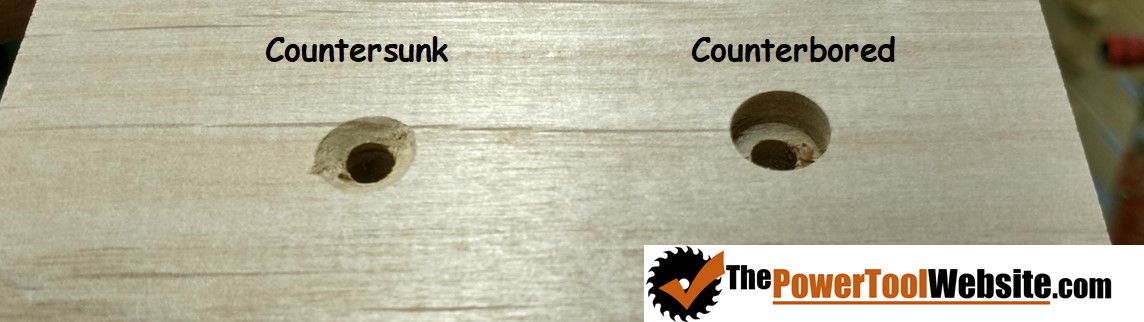
Countersinking is done to allow a countersunk screw head to seat in the wood either flush or below flush. That way you don’t have any screw head exposed above the surface of the wood.
This is done with a countersinking bit as mentioned above.
Here’s a quick video from Kreg illustrating the use of a countersink bit. FYI, in the narration the guy talks about drilling a pilot hole, but in reality he’s drilling a clearance hole, so don’t let him confuse you.
Countersinking can be useful if you’re wanting to hide the screw heads by filling with a wood filler or putty. Countersinking (done deep enough) will allow room to fill the holes, sand flush, and make the screw heads disappear.
Or, you may just want a more refined look and prefer the heads of the screws to be flat and flush with the surface of the wood.
If you are using screws with a flat bottomed head, like a pan, pan washer, or truss, you don’t want to countersink.
Instead you’ll want to leave them flat against the face of the board, or you can counterbore your clearance hole…
Counterboring
This is done to give clearance for sinking a panhead screw for example, or even a hex bolt. It leaves a flat surface for the head of the screw or bolt to rest against.
This is common in pocket hole joinery. The pocket hole drill bit leaves a counterbored hole and a clearance hole in the leading board. The counterbored hole gives a good, flat surface for a pan head (or pan washer) screw to seat.
Another common reason for counterboring is when you’re attaching something with a bolt, or a lag screw. These may require the use of a socket set to tighten, and may even require a washer.
The counterbored hole should be sized big enough to accept the washer or the socket needed for the head of the bolt, whichever is bigger.
Counterboring can be drilled with Forstner bits, or Paddle bits. Paddle bits are much cheaper than Forstner bits, but they don’t leave quite the refined flat bottomed hole the Forstner bit produces.
Be sure to sign up below to get lots of beginner woodworking stuff including tips, techniques and projects, sent straight to your inbox!
Related:
Beginner Woodworking – Everything To Get You Started
Introduction To Basic Woodworking Joinery
Pocket Holes – How To Do Them Correctly
All About Brad Point Drill Bits
Types Of Wood Glue And When To Use Each